
OpenAir Redesigned Advanced Filters (Optional Feature)
The Redesigned Advanced Filters feature is an update to the previous existing advanced filters on redesigned list views. The redesigned advanced filters panel is compact and lists filter conditions horizontally instead of vertically. It lets you select and apply saved filters directly from the list view toolbar instead of a pop out window. The updated design brings better usability and takes less of your display space.
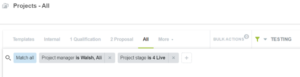
To create a new advanced filter, navigate to a particular list view of a module.

- Click the caret icon
 and select the create icon
- This will allow for a dropdown of filterable options to appear.
- The filter selector in the list view toolbar shows the name of the filter that is currently applied to your list view or All data if no filters are applied.
- Each filter condition shows the field name, the comparison operator and the value in a simple sentence structure. If multiple values are selected, the filter conditions shows a number
 indicating the number of values selected instead of the value.
- Click a filter condition to modify it, or click the clear icon
 to remove a filter condition.
 - To add an additional filter condition:
- Click a filter condition to modify it, or click the clear icon
- Click the add icon in the advanced filter panel.
- Enter a field name. A list of matching available field names appears and is updated as you type.

7. Select the relevant field.
8. Select a comparison operator.
9. The logical operator is shown in light blue color background. Click the logical operator to change it. Select Match all if the results must match all specified filter conditions (AND logical operator) or select Match any if the results must meet at least one of the specified filter conditions (OR logical operator).
10. The default name for newly created filters is Unsaved Filter.
11. A red asterisk ![]() next to the filter name indicates there are unsaved changes.
next to the filter name indicates there are unsaved changes.
a. Click the filter name to select and apply one of your saved filters, or to clear advanced filters and show All data.
b. Click the carat icon![]() to save the new filter (Save as) or you can select the save and apply button at the bottom of the form.
to save the new filter (Save as) or you can select the save and apply button at the bottom of the form.
c. or click Clear to clear all filter selections.
12. Click Save and Apply to save the changes you made to the filter, or click Clear to clear all filter.
13. Click the carat icon ![]() and select Delete if you would like to remove the filter set.
and select Delete if you would like to remove the filter set.
Things to remember
- You must add at least one filter condition before you can save the filter.
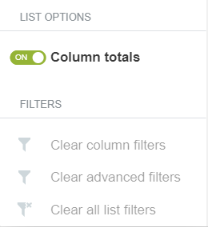
- You can clear all filters on the form by navigating to the more options drop down and selecting clear advanced filters, column filters, or list views.
- If you select the (F) Key it is a shortcut option to bring up and dismiss the advance filter on the list view form.
- It is not necessary to select or enter a value for each filter condition you define. The filter condition will be ignored if the value is not specified. This may be helpful if you want to configure saved filter templates, which you can then can adapt by selecting relevant values for each filter condition.
