
How To Use Custom Time Ranges To Expand Your OpenAir Reporting Options
Are you hard coding a lot of dates into your reports? Is your fiscal year offset from the Jan-Dec calendar? You may be missing out on using a key feature called Custom Time Ranges to help your OpenAir reports.
NetSuite OpenAir reporting uses default calendar controls for time period reporting such as quarter, month, and year. These reporting periods may not line up to your fiscal year or month definitions. NetSuite OpenAir allows you to assign a custom time range to reports according to your organization’s calendar.
Having difficulty in viewing information from an opening and closing balance financial view? Custom time ranges can also be used to introduce unique time period structures such as Opening Balance/Month Burn/Closing Balance type formats.
How
Custom time ranges provide a unique reporting period selection for summary reports. For customers that have a 4-4-5 accounting calendar or an offset fiscal year/quarter definition, custom time ranges support time ranges defined according to your terminology. Custom time ranges are not unique to certain types of summary reports. They are available for use on any summary report.
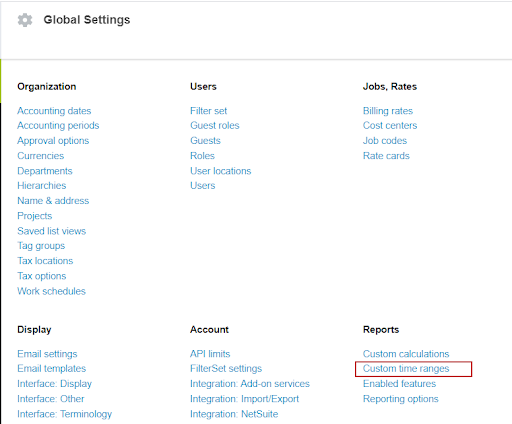
To create a custom time range, navigate to Administration → Global settings → Custom time ranges
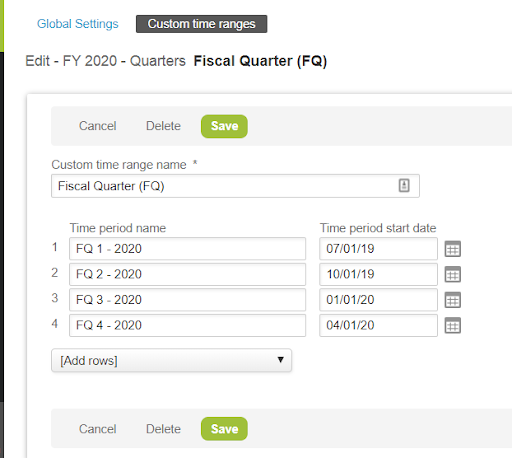
When you select the option to Create a new custom time range, you are presented with a blank form that simply has a Name and Date column. Here is how the custom time ranges work:
- The name is what will appear as the column or time period name in summary reports
- The date is the starting date of the period
- The ending date of the period is the last day prior to the next row of the custom time range.
- The last row of the time range should have a name like ‘end’ and will not appear as a reporting column. It simply exists to provide an end date to the previous row entry.
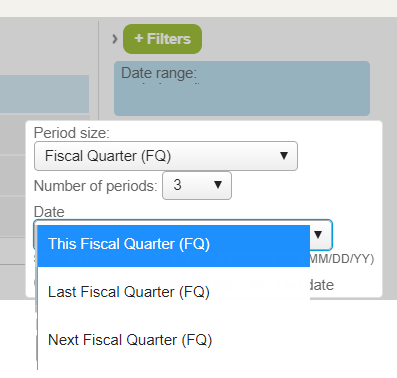
To use the custom time range on a summary report:
- Set the Period to be the custom time range name
- The # of periods would align to the desired number of periods defined in the custom time range. The # of periods in a custom time range is the number of rows minus one (since the last row is for ending date control of the last period). In the example above, Row 4 would say END so only three periods exist for this range.
- Set the Date to be ‘last <custom time range name>’ or ‘this <custom time range name>’ or ‘next <custom time range name>’.
- Each selection uses today’s date as the index and the # of periods to determine which periods are included.
Using the above time range as an example and assuming the current date is February 07, 2020:
- The current Fiscal Quarter is FQ3 and would report on data from 1/1/20 – 3/31/20
- Last Fiscal Quarter would report on 2020 FQ2
- Next Fiscal Quarter would report on 2020 FQ4
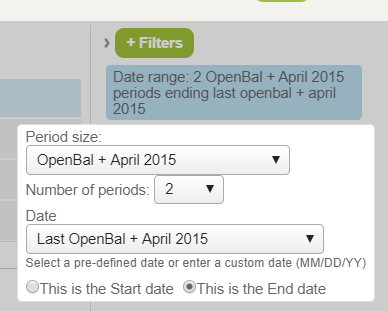
There may be instances where you want to group a large date range into a single period. To set up an opening/closing balance custom time range, the time range must be defined each month to understand what the ‘current’ month is (or updated each month to change dates).
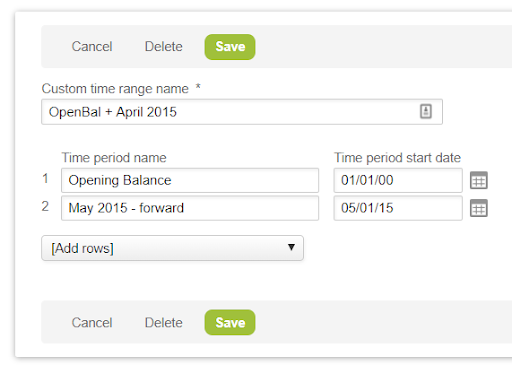
On a Crosstabbed or summary report, you would select this custom time range along with two periods and a ‘last OpenBal + April 2015’ date value as the end date (if your current date is now May, 2015).
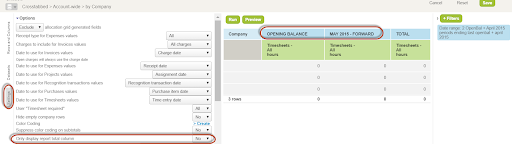
One thing to make sure is the closing balance will actually be the ‘total’ column view that is standard with NetSuite OpenAir summary reports. Make sure you are not suppressing this and display both time periods and total columns. The column visibility controls are found on the summary report below the subtotals section.
A word of caution
Custom time ranges require maintenance to ensure dates are accurate and updated annually, monthly, or whatever definitions lie under the custom time range timeline.