
Utilizing SuiteProjects Pro Baselines to Track Project Progress and Changes
The Baseline feature allows users to capture the current status of a project at any moment and save it as a Baseline. Users can then compare the current project status with that baseline to identify changes in:
- Start and finish dates
- Planned hours
- Duration
- Percent complete
- Revenue
- Cost
- Budgets
Important: Baseline comparisons do not track changes in user assignments.
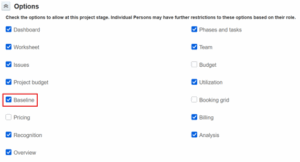
Enable Baselines for the Project Stage
1. Navigate to Administration > Application settings > Projects.
2. Click Project stages.
3. Select the desired Project stage.
4. In the Options section, check the box next to Baseline.
Verify Role Permissions for Viewing/Modifying Baselines
Baseline permissions are role-dependent. Without this permission, the Baseline menu will be hidden, even if project stages allow baselines.
1. Navigate to Administration > Global settings > Users.
2. Select Roles.
3. Choose the appropriate Role.
4. Check the box for View and modify the baselines.
5. Click Save.
Creating a Project Baseline
1. Navigate to Projects > Projects > All. You can use the column heading or advanced filters to find desired project.
2. Select the desired Project.
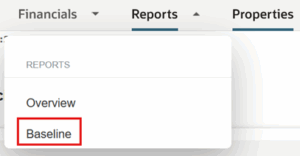
3. Click the More menu (look for the arrow next to More in the top menu).
4. Hover over Reports to open the submenu.
5. Click Baseline.

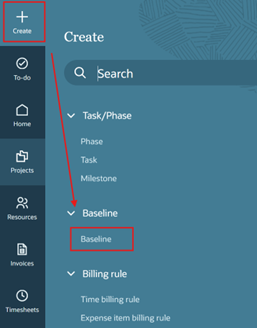
6. Click + Create.
7. Enter the following:
-
- Baseline: Select Baseline
- Baseline name: Enter a meaningful name (e.g., “Kickoff Baseline”)
- Notes: Add any relevant details (optional)
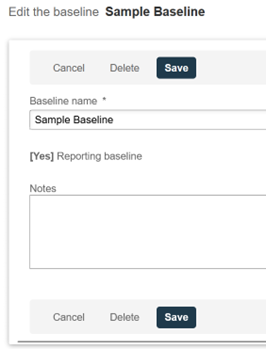
Note: If multiple baselines exist, one can be designated as the reporting baseline, which becomes the default reference point for reports.
8. Save the baseline.
Editing an Existing Baseline
1. Navigate to Projects > Projects > All. You can use the column heading or advanced filters to find desired project.
2. Select the desired Project.
3. Click the More menu (look for the arrow next to More in the top menu).
4. Hover over Reports to open the submenu.
5. Click Baseline.
6. Click Edit.

7. Make updates as needed.
8. Click Save.
Note: Edited baselines should be documented internally for audit purposes. Users are encourage to maintain notes describing what changed and why.
Reporting on Project Baselines
1. Navigate to Projects > Projects > All. You can use the column heading or advanced filters to find desired project.
2. Select your Project.
3. Click the More menu (look for the arrow next to More in the top menu).
4. Hover over Reports to open the submenu.
5. Click Baseline.

6. Click the Report link to open the baseline report.

Note:
- Use the Compare against dropdown to compare the selected baseline with another saved baseline.
- Users can also access baseline reports from individual tasks via the tip link:
“Click here for a baseline report” — available when the project has at least one baseline.