
How to Use Timesheet Adjustments in SuiteProjects Pro to Correct Project Billing and Financials
Time entry mistakes happen, and in some cases, those errors may make their way onto a client invoice. Understanding how to use the Timesheet Adjustment feature in SuiteProjects Pro is essential for correcting time entries, ensuring accurate client billing, and keeping project financials up to date.
In the example below, we will review how to perform a Timesheet Adjustment and re-run project billing to generate the necessary charge corrections for a future invoice.
Prerequisites:
- Time has been entered and approved against the project.
- An invoice containing the associated time charges has been created but is not yet approved or integrated to NetSuite.
- An adjustment is required to correct time entries on the invoice.
Steps:
1. Identify the timesheet that requires an adjustment by navigating to the Timesheets module > Approved timesheet stage.
- Use Advanced Filters to quickly locate the appropriate timesheet. In the example below, the Timesheets list view is filtered by User and Timesheet Date to identify the specific timesheet that needs to be adjusted.
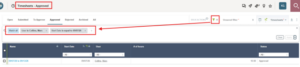
2. Open the timesheet by clicking the timesheet Name
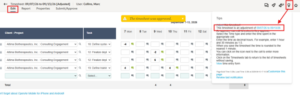
3. Navigate to the “Edit” tab of the timesheet
4. Select the “Tips” icon in the upper right corner of the page
5. Click the link to “Adjust this timesheet” to begin the timesheet adjustment process
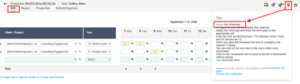
6. Make the necessary adjustments to the timesheet. Adjustments may include updating hours, moving hours from one task to another, or correcting other time entry details. Once all changes have been made, click “Save” in the upper-right corner.
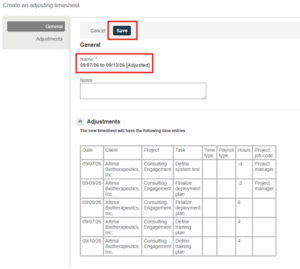
7. A confirmation screen will appear, allowing you to review the adjustments before they are finalized. Review the changes and click “Save” to generate the adjusted timesheet.
-
- Note: A Timesheet Adjustment does not modify the original timesheet. Instead, SuiteProjects Pro creates a new timesheet that reflects the adjustments made. The new timesheet will retain the original timesheet name with [Adjusted] added to the end. If additional corrections are needed, a timesheet can be adjusted multiple times.
8. The original timesheet will have a direct link to the adjusted timesheet in the Tips icon.
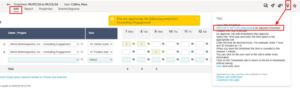
9. Similarly, the adjusted timesheet will have a direct link to the original timesheet in the Tips icon.
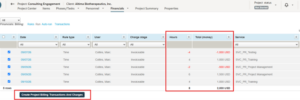
10. Once all Timesheet Adjustments have been finalized, re-run billing for the project. New time charges reflecting the adjustments will appear within the pending billing results.
11. Review and validate the new charges to ensure the adjustments are reflected correctly. Once confirmed, click “Create Project Billing Transactions and Charges” to generate the adjustment charges that can be included on the next invoice.
12. Navigate back to the original Invoice created by going to the Invoices module > Open invoice stage. Select the Invoice Number to open the invoice.
13. Navigate to the “Charges” tab of the invoice. The newly generated adjustment charges will appear as available charges.
14. Select the applicable charges and click “Add” to add them to the invoice.
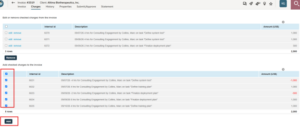
15. The invoice will now reflect the applicable Timesheet Adjustments. Review the updated invoice for accuracy, then submit it for Approval. Once approved, the invoice can be integrated into NetSuite.
16. Time entries, project billing, and project financials are now updated to accurately reflect the Timesheet Adjustments.